Introduction
Thousands of GenAI prototypes are launched every week, but very few make it to production. The MIT State of AI in Business 2025 Report notes that “only 5% of custom enterprise AI tools reach production.” The main challenge isn’t model capability or prompt quality; it’s turning the system into something that works in real-world operations. In our experience, solutions that work in a notebook often break down when faced with many users, strict security, governance, and cost limits. Getting GenAI into production is less about clever chains or agents and more about building scalable architecture, strong observability, enterprise-level security, and fitting into existing workflows.
This is the first blog in a three-part series that will enable you to deploy production-ready AI agents in Snowflake. We’ll begin by covering the architectural foundations needed to move from prototype to production. In the next blog, we will add observability to the agent to keep the system trustworthy at scale. Finally, we’ll show how to integrate the system with CI/CD pipelines using GitHub Actions, making deployments repeatable, governed, and production-safe.
Architectural Foundations for Agentic Deployment
We’ll begin by walking through how to deploy a modular AI agent in Snowflake based on the following high-level architecture:

This architecture shows how the system we are designing is broken into clear, modular layers with specific tools selected for each:
- The FastAPI layer allows clients to access the AI agent
- The service layer, which in most systems encapsulates the core business logic, will in this case encapsulate our agent built using LangGraph
- Snowflake Cortex AI manages the LLM interactions
We are opting to run the system inside Snowpark Container Services (SPCS), which allows the agent to run directly within Snowflake to ease container orchestration, scaling, and secure authentication to other Snowflake services. This setup keeps inference close to your data, simplifies networking, and eliminates the need for external infrastructure, making the agent ready for production within Snowflake.
With the architecture and deployment environment established, we now move into the core of this post: a step-by-step implementation grounded in the workflow illustrated below.

In the next few sections, we will cover building the agent logic with LangGraph, how we expose the agent through a FastAPI service with proper session and dependency management, and packaging and deploying the service inside Snowflake using Snowpark Container Services. By the end of this blog, you will have a practical roadmap for taking an agent in Snowflake from prototype to production.
Building your agent with LangGraph
LangGraph is a robust agent orchestration framework for building, deploying, and managing complex agent workflows so they are ready for production using a graph-based approach.
The core of our system is the LangGraph StateGraph. A graph is made of nodes representing the logic of the agents, and edges which determine the execution of the graph based on the current state. For the purpose of this blog, we created a simple agent with an LLM node that interacts with the managed LLM in Snowflake Cortex using the AI_COMPLETE function. This setup generates text responses to prompts using LLMs hosted in Snowflake. This eliminates the need for external API calls to access industry-leading LLMs, keeping data within your secured and governed environment, and reduces operational burden.
For developing and testing our agent, we used LangGraph Studio which provides a local environment for data scientists and engineers to quickly build, update, and test agents, as shown in Figure 3. You can test changes in real time with an interactive interface that closely matches production behavior, making it easy to check performance and user experience. Once the workflow is validated locally, you can move the agent into a CI/CD pipeline for a smooth and reliable transition to production.

Beyond simple sequential flows, LangGraph also supports parallel execution of nodes. This significantly improves performance in workflows that require concurrent execution of independent tasks. Additionally, LangGraph manages a runtime context that allows tools to be injected dynamically during execution. This allows behavior to be adapted as the workflow runs.
Now that we have tested and validated our agent, the next step is to make it available through a service for clients to interact with.
Exposing your agent with FastAPI service
This is where FastAPI comes in. The FastAPI layer defines client interaction with the agent, checks incoming requests, runs the LangGraph workflow, and returns a structured response. By introducing this service layer, we allow the agent to integrate seamlessly with applications, dashboards, or other systems.
It’s important to understand that the FastAPI app does not contain any model-specific logic. All intelligence is handled by the orchestration layer, making the app independent of the agent’s behavior, keeping the system modular and easy to update or scale. You can also add features such as authentication, rate limiting, logging, and observability to the app without changing the agent graph.
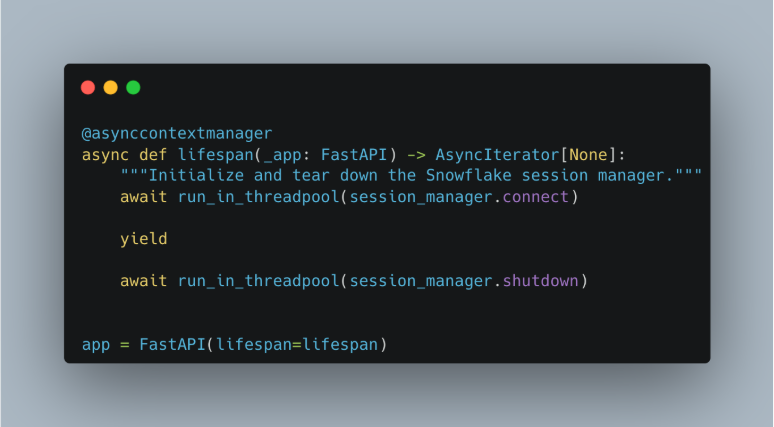
For users to interact with the Snowflake Cortex agent, we also need to set up proper management of a Snowflake session. Each request must establish an authenticated connection to Snowflake to securely access Cortex and other platform tools. In FastAPI, the best place to initialize shared infrastructure like this is the application’s lifespan function (Figure 4). The lifespan hook runs once at startup and once at shutdown, making it ideal for setting up and cleaning up long-lived resources. At startup, we initialize the Snowflake session manager (Figure 5) and prepare the agent so they’re ready before any requests come in. When the app stops, we gracefully shut down those resources.
For each endpoint, we keep session usage clean and explicit by using an asynchronous context manager. This starts a session at the beginning of the block and releases it when finished. Each request gets its own session, preventing concurrent reuse and ensuring safe execution. The manager also uses lightweight pooling with a small pool limit to control Snowflake resource usage and refreshes sessions before they expire. By combining lifespan-based initialization with explicit context-managed access, we get a safe, efficient, and maintainable session layer for production workloads.

Deploying your agent inside Snowflake with Snowpark Container Services
Once our agent is built and exposed, the final step is to deploy it in Snowflake using Snowpark Container Services. Since we built a modular system with clear separation between layers, deployment can be focused on packaging rather than redesigning.
Before diving into the deployment steps, it’s worth briefly visiting how Docker fits into this process. Docker allows us to package the application into a portable container image. This image can then run consistently across environments, whether locally, in CI pipelines, or inside Snowpark Container Services. Snowpark Container Services executes these container images directly within Snowflake, allowing us to deploy custom services like our FastAPI-based AI agent.
We define our Dockerfile (Figure 6) to package the whole system into a container image that includes the FastAPI service, the compiled agent, and all required dependencies. Building a container image in this way does two things:
- It creates a reproducible runtime environment, and it ensures that the same application tested locally is deployed in Snowflake
- It reduces inconsistencies between development and production

After building the image locally, we use the image registry service offered by SPCS to create an image repository within the service and upload the image to the storage unit once authenticated (Figure 7). This brings deployment assets under Snowflake’s governance and lets them be accessed and run by the Snowflake ecosystem. You can create as many image repositories and images as needed for your deployment process by isolating environments.

Once the image is in the registry, we can build the service. To keep things reproducible, we will define a specification file (Figure 8) for the service creation and upload it to an internal Snowflake stage. This file describes the container image to run, the compute resources to use, and how to expose the endpoint. Creating services this way makes it easier to maintain and support consistent deployments across environments. To create an SPCS, you need to have a compute pool available where Snowflake runs services, as shown in Figure 9.


When the service is created, Snowpark Container Services provisions the runtime and deploys the container in the Snowflake environment, handling infrastructure scaling. The FastAPI application is then accessible through the configured endpoint and is ready to receive requests and return responses from your agent, as shown in Figure 10. Since the service runs within Snowflake, communication with Snowflake Cortex remains internal, minimizing data movement and strengthening governance.

Deploying in this way ensures the agent is production-ready by design. It is secure, scalable, and compliant with data governance rules, while allowing you to update individual components independently as the system grows.
In the next blog, we’ll focus on adding AI observability to this system. With structured evaluations and trace-level visibility, you can iterate confidently, optimize performance, and make sure your AI agent is trustworthy and transparent in production environments. We’ll show you how to evaluate and trace your GenAI application to benchmark performance, assess outputs, and log execution traces for debugging.
Partner with Aimpoint’s Team of AI Experts
Ready to turn your GenAI prototypes into production-ready systems? Our team of experts specializes in architecting, designing, and operationalizing AI agents at scale. We’ll help you build the AI systems for your use case and productionalize them seamlessly.


.png)